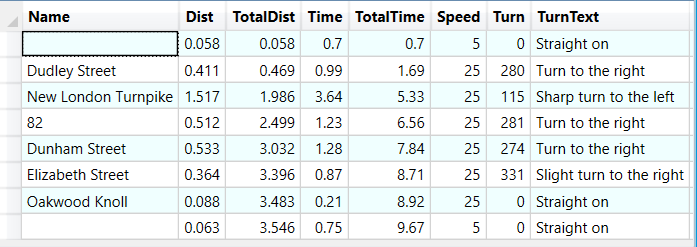
Go to Create Network ![]()
In order to create a network to use for routing with RouteFinder, these steps should have been prepared first:
Input file
You need to have a TAB file in either native format or native extended format (64 bit only).
Tabular data must be stored in DAT or DBF file.
It should only contain lines and single-sectioned polylines.
Loop polylines should be split.
The table must be packed.
The coordinate system must be geographical or projected / cartesian.
For instance Web Mercator can not be used.
Road class attribute
This field will define the different classes of roads. The basic classes of road should be between 0 and 31. To define a one way street add 512. Add 1024 to create a one-way street that has been digitised in the wrong direction.
Each road class from 0 to 31 can be assigned a different speed through the Road Speed options after the network has been created and loaded.
An example: If the first link in the network is a class 1 road (e.g. a motorway), which can only be travelled in the direction of digitizing, the attribute will be 1 + 512 = 513.
There are more settings you can add manually to a link and they are:
Add 256 if it is a no through road. A route can start or finish on the link but it cannot be used as route through to another link on the network
Add 512 if it is a one-way street, which may be travelled in the digitised direction.
Add 1024 if it is a one-way street, which may be travelled in the opposite to the digitised direction.
Add 2048 if a link is part of a roundabout. This is used in generating driving directions.
Add 4096 if a link is a "non-driving" link. This can be used to mark ferries and car trains, so their length is not included in driving directions.
Add 8192 if it is not allowed to make U-turns at the from-end of the link.
Add 16384 if it is not allowed to make U-turns at the to-end of the link.
Add 32768 if it is not allowed for a route to start on the link.
If you don't have any information about road classes, just add an integer field with all zero's.
This means the same speed is used all over the network and all links can be traveled in both directions.
Actual creation of network
When the steps above has been taken care of, you are ready to create a network.
From the RouteFinder TAB select the "Create Network" from the first group of controls. The following dialog is displayed:
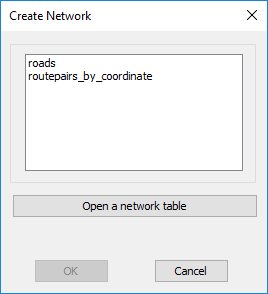
Select the required table from the list displayed
If the table required is not currently open then use the open table button to select the required table.
If your table has deleted rows you will be prompted to to pack the table before the rest of the process can continue.
A default speed file will be created if one has not been previously generated.
You can use Options > Set Roads Speeds to adjust the required speeds for each class of road.
You can also create other speed files to represent walking speeds, buses or any other transportation mode.
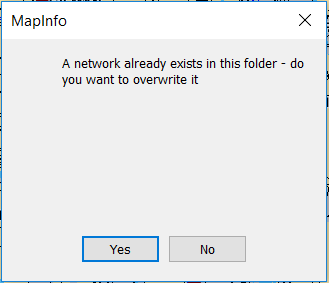
If a network for the selected table already exists, then you will be prompted to confirm overwriting of the network files.
When the user clicks on the OK button the next dialog is displayed
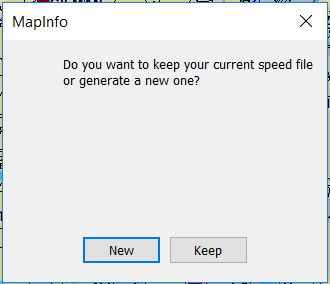
After pressing OK you may also be asked if you want to keep your existing speed file.
This is useful when you are creating a network after a small change but the road classes have remained the same.
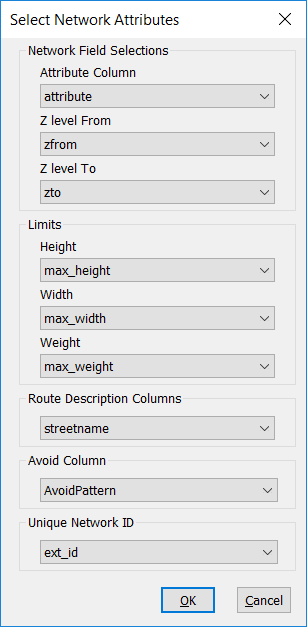
Attribute Column
Select the attribute column to use by selecting it from the drop down list. This field will have previously been set up as defined above.
Z-Levels
If the network has Z-Levels (Grade separations defining bridges and under passes), then you can use the next two drop down boxes to select the column for these values.
Z-levels is a number from -9 to +9, with the majority of the values being 0.
Limits
It is possible to define height, width and weight restrictions and these are store in a smallint column (range 0-255) in the table and affect the link associated with that row.
Height restrictions are defined in tenths of a meter in 0.1 steps (i.e 73 = 7.3 meters)
Width restrictions are defined in tenths of a meter in 0.1 steps (i.e 52 = 5.2 meters)
Weight restriction are define in half a tonne steps (i.e 19 = 9.5 tonnes)
These values are stored in their own columns and more than one restriction can be defined on each link.
Route Description Column
The route descriptions are set from the column containing the relevant data and is selected from the drop down list.
When a route or traveling salesman has been generated, a window will appear with the directions and it will also be possible to click on each part of the route description and see it highlighted on the map.
Avoid Column
This column will hold details of situation when this link should be avoided. It might be that the link is not safe to walk on or you may want to avoid toll-roads. Up to 8 avoids can be defined on a single link.
In order to define avoids you would add the following values to Avoid column in your table
1 - Avoid setting 1
2 - Avoid setting 2
4 - Avoid setting 3
8 - Avoid setting 4
16 - Avoid setting 5
32 - Avoid setting 6
64 - Avoid setting 7
128 - Avoid setting 8
The avoid values are additive so if you wanted a specific link to be avoided in option 1, 2, 5 and 6 then the value in the avoid column in your table would be:
1 + 2 + 16 + 32 = 51
You can manage these settings via the Set Avoids option in the restrictions group.
Unique Network ID Column
This column would contain a unique reference for a link in the database. It would be used when you want to import turn restrictions that are based on a Link ID rather than a row id.
When picking a field, it is checked if it is actually unique.
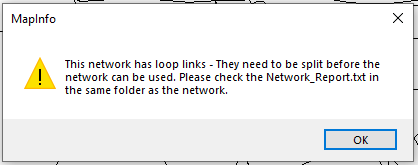
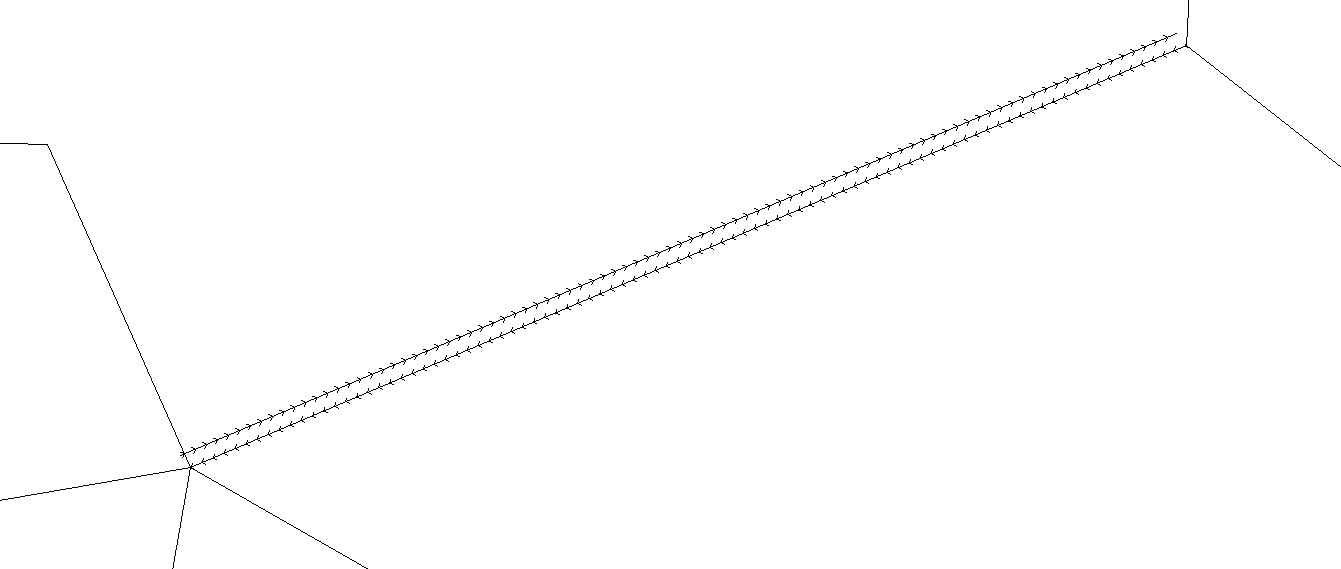
Loop Links
If your network contains any loop links then you will see this message:
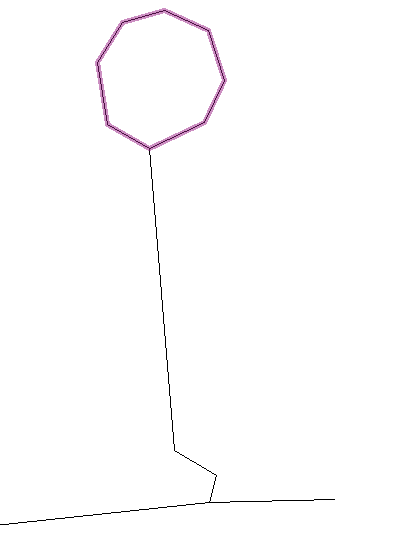
An example of a loop link is shown below.
You will need to split these links before a network can be created.
It is also possible that you will see the following message:
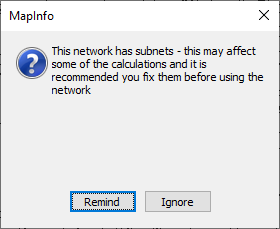
If any subnets exist in the network being opened then a message is displayed.
This message can be ignored until the next time the network is created or you can be reminded the next time the network is loaded.
We recommend you remove subnets as they can cause errors in the routing calculations.
You can use the subnet check in the analyze menu.
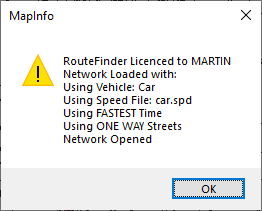
On a successful network loading you will see a summary screen detailing the current settings.
From version 6.03 there is now limited support for duplicate links. For example:
Here the duplicate links have been separated to show the differences.
In this example there are 2 geometrically identical links, with opposite one-way restrictions (512 and 1024).
Each link can have its own class attribute associated with the link. This means that each link can have its own speed.
It might replicate a situation where a road may be free flowing in one direction but really slow in the other perhaps because of rush hour or regular congestion.
RouteFinder will take that into account when doing these calculations:
•Route
•Route Pairs
•Joined Table
•Select Locations without optimization
•Traffic Volume
•Update Point File
It is supported here, if "avoid through roads" is true for the active vehicle:
•Distance Matrix
•All optimizations (including TSP)
•Select Locations with optimization
It is not supported in:
•Nearest N Centres
•Isochrones
•Service area
•Most kind of network analysis