Go to Options > Route ![]()
We have the concept of a vehicle and that vehicle have a number of properties such as using one way streets or calculating costs. Each vehicle has it own speed file associated with it. So you could have a car that uses one set of speeds and a Heavy Goods Vehicle which has a different speed file. This combined with the calculation of costs and the use of limits makes it very easy to calculate for vehicles with different uses.
When the item is clicked the following dialog is displayed:
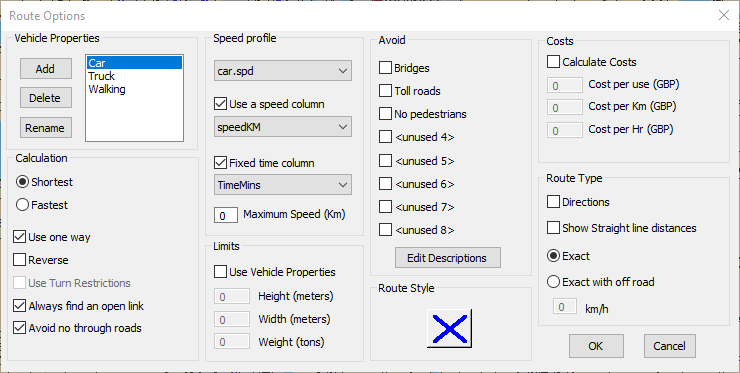
Calculation Group
Shortest or Fastest
You should select the calculation type required shortest or fastest. This will determine whether upon calculating a route, the shortest or fastest path is generated. This also affects the Drive Time Polygons and all other calculations. In "Fastest" Mode the polygons represent actual drive time, whilst in "Shortest" mode the polygons will represent Drive Distances. The menus are changed to show which mode you are currently working in.
Use One Way
With this option checked one-way street restrictions are obeyed. When unchecked then the network effectively becomes a walking network where you can go both ways on a one way street or any direction around a roundabout.
Reverse
With this option checked then all the one-way street restrictions are reversed. This is especially useful in combination with isochrones which are calculated from the center. If your interest is an isochrone showing how to get to the center, use this option. Note: You can not reverse turn restrictions the same way.
Use Restrictions
This will allow your network to use any turn restrictions that are available on the network. The restriction will have been previously set up on the network either manually or via the Import Turn File option. It should be noted that turn restrictions are not used when generating multi-centred isochrones (that is link and voronoi isochrones).
Always find an open link
If the user clicks and the nearest link is closed because of the Avoid settings or some other reason then this option will find the next nearest link that is open and routing can take place. While this gives greater usability for the user they have to be aware it can lead to misleading results and so they use this at their own risk.
Avoid no through roads
If this option is checked then if there are links that have been defined as no through roads then this will be taken into account when performing route calculations. However there are some functions where the no through attribute is ignored and these are Nearest N Centers, All Isochrones including Service Area and Center of Network.
Calculating matrices gets a lot slower, so don't set this option, unless you actually have "no-through-roads" and these are important to your calculations.
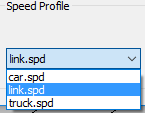
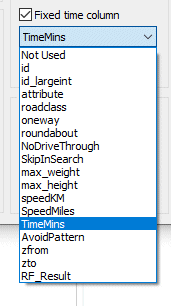
Speed Profile
Each vehicle can have its own speed profile or use a speed column in the table. You can have multiple speed files that hold different speeds for the same network. This means you can have a speed file for peak, off peak or even walking speeds.
To set a speed file for the current vehicle just click on the drop down box and select the required one.
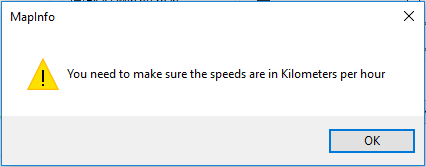
If your road dataset has a speed allocated to each link then you can overwrite the default road class speed as defined by the attribute. By checking the Use a Speed Column option you can pick a relevant numeric field. The first thing you will see is a warning to make sure the speeds in any column you select will be the same units as the currently loaded speed file:
Then you can select the column from you table:
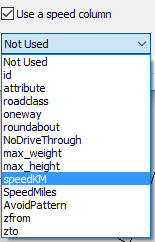
Any records that have a zero will be ignored and the default road speed will be used.
If you have a column in your table that has links with Fixed Times then you first check Fixed Time Column then you can select the column in the network table that has the times in minutes.
Maximum Speed
If you put a value in this box then it will set the current vehicle to a speed which the vehicle will not exceed no matter what the speed is on any particular link.
Limits
Use Vehicle Properties
In order to use this section you will have had to have imported any height, width and weight restriction columns as a part of the network creation process. If you have done this then you will be able to enter limits for your vehicle that are then taken into account during any calculation process. To enter the limits for the current vehicle, tick the "Use Vehicle Properties" box and then any limits that can be used will be enabled.
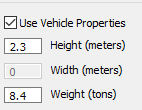
Enter the required limits for the currently selected vehicle. The limits will be checked to make sure they do not exceed a valid range when the vehicle is changed or the OK button is pressed.
Avoid Group
This option is only enabled if you have imported a column from your table that contains the avoid pattern as a part of the network creation process.
This will let you run the same network in different ways. For instance, you may decide you want to avoid all motorways or trunk roads (if you were walking for instance) then you can define those avoid values in a column in your table.
That value is then used if you set a particular vehicle to avoid certain types of roads during the calculation process. In order to define avoids you would add the following values to Avoid column in your table:
1 - Avoid setting 1
2 - Avoid setting 2
4 - Avoid setting 3
8 - Avoid setting 4
16 - Avoid setting 5
32 - Avoid setting 6
64 - Avoid setting 7
128 - Avoid setting 8
The avoid values are additive so if you wanted a specific link to be avoided in option 1, 2, 5 and 6 then the value in the avoid column in your table would be:
1 + 2 + 16 + 32 = 51
This link would then be avoided if any of the 1, 2, 5, 6 check boxes were ticked.
You can set the names for each avoid option by using the Set Avoids option in the restrictions ribbon group.
Route Style
The route style button will allow the user to select the line style used to display calculated routes on the map.
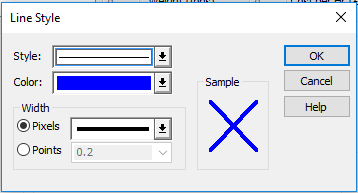
From here the user can choose the style, colour and thickness of the line used to display routes. This dialog may vary from version to version of MapInfo Professional.
Costs
If you want to estimate the financial cost for using a vehicle the values can be entered here. To enter the limits for the current vehicle tick the "Calculate Costs" box and then three boxes below that will be enabled.
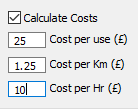
When a route calculation is performed you will see the cost appear in the message window or if it is a batch function, it will be an extra column in the result table.

Route Type Group
Route Descriptions
The route descriptions are switched on or off for the calculation that produce a route. This option is only enabled if you have imported road names as a part of the network creation process.
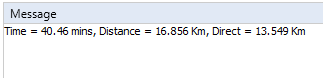
Also Calculate Straight Line Distances
When this option is checked you will get a straight line measurement for the requested function as well as the normal Time and distance calculations. An example of this is shown below:
This is used to control the dynamic segmentation options. These are as follows:
Exact (dynamic segmentation)
The route is calculated from the nearest part of a link from where the user clicked. The resulting route will take into account the amount of time and distance to travel the partial segment of the link.
Exact with Off road
This is the same as the above option except it will also add a link from the point where the user clicked to the nearest part of the network. To use this option you will need to put in an off road speed. This is used to estimate the amount of time it takes to get from the start and end points to the network. The resulting route will take into account the amount of time and distance to travel the partial segment of the link.
Adding and Removing Vehicles
A default vehicle should always be set up by the program but you can add and remove your own vehicles.
Add Vehicle
When you click this button you will be prompted to enter a name for new vehicle.
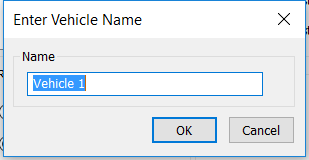
You can accept the default name or change it to something else. When you press OK this vehicle is added to the list and the options reset ready for you to enter a new set of details.
Delete Vehicle
When you click this button the currently selected vehicle is deleted from the list and the first vehicle is then loaded up.
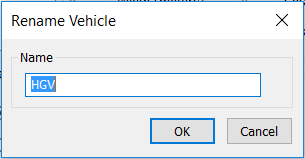
Rename Vehicle
When you click this button then you are prompted to enter the new name for the currently selected vehicle.
When you have made all the changes required and OK is clicked then the settings are applied.
It is important to understand the hierarchy of how the speeds are applied to road links.
The first level is through the road classes and the related speeds you have just entered.
These speeds are then superseded if a column with speeds per link are loaded through the Route Options. If any road link in a column has a zero in it then the road class is used.
Finally, if the user overrides the speed on a link by using the Change Road Speed tool then this speed will take precedence over the other settings.